Container Security
This page aims to sum up security best practices to apply to all docker or
podman projects.
Some recommendations are explicitly specified if you are working with sensitive data.
Why Worry?
In Docker, containers don’t have any security dimension by default.
When you are using Docker, by default, you are using root account during all the process. This is mainly because how Docker was designed (see Architecture below).
Running a container as root means that the user is root in the container. If the user breaks out of the container, he will still be root.
This short video gives a great example of how escalate privileges on the host with a default docker container running.
This article explains how you can root your Docker host in 10 seconds.
If it is in a lab environment, for tests purposes and you don’t use any sensitive data, then this may not be a big issue (depending on the use case). But if you are in production with all the default docker parameters, then you may experience some bad surprises.
The recommendations presented in this document apply to the whole container’s life cycle. You may not have the control over everything. That is okay, secure what you can.
Introduction
First, if you are not familiar with Docker, have a look at the architecture (source).
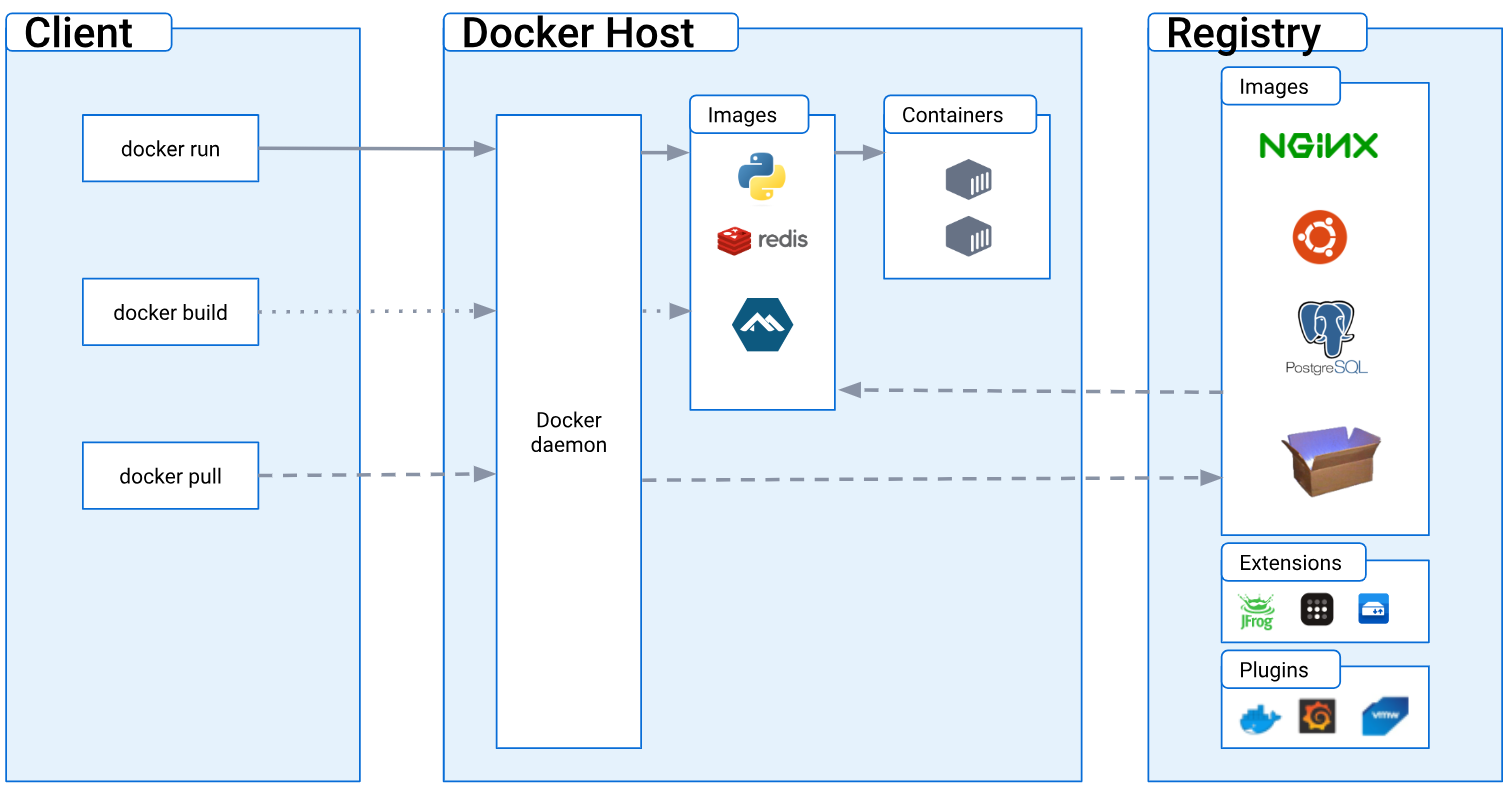
Basically, the Docker client makes API calls to the Docker daemon that is responsible to create and manage containers. Docker daemon must have root privilege to run, so this is why by default a container is root.
Development Vs. Production
As mentioned before, if you are in a production environment or you deal with sensitive data, you must apply these best practices. They may not be all relevant, it may not be possible to implement some of them - due sometimes to technical limitations - but do as much as you can. If you have any doubts, feel free to ask a question to discuss about your specific use case and the security risks associated.
If you are in a development environment, you may apply only the most relevant best practices. If you are just exploring possibilities and testing ideas, you may drop all these recommendations - just keep in mind the short video and the article mentioned above.
Also remember that it is easier to implement security at the beginning of a process rather than at the end, when everything else is running.
Best Practices
Basics
These recommendations apply to everyone
Keep OS & Docker Up-to-Date
To prevent from known vulnerabilities. These vulnerabilities usually end in escalating privileges to root or admin and conquer the host.
Image
These recommendations apply when you need to choose/pull an image
Only Use Images From Trusted/Official Sources
Pin Image Version
Latest tag or specific version?
An image reference has the following specifications (distribution spec).
Some examples are:
alpine:latest (using a tag)
docker.io/library/alpine:3.20.1 (using a tag)
docker.io/library/alpine@sha256:dabf91b69c191a1a0a1628fd6bdd029c0c4018041c7f052870bb13c5a222ae76(using
  a digest)
By being very specific and pinning down a version, you are shielding yourself from any future breaking change. On the other hand, using the
latesttag ensures that more vulnerabilities are patched on the fly. Remember that a tag is just a label and the true version behind may change from one build to another.This is a trade-off, but pinning to a stable release is what is generally recommended. Thus, you make your work reproducible, which is another security key concept.
Referencing images in deployment: In order to correctly pin a specific version, you must use the digest (not a tag!).
For image references in production systems you must use a digest (e.g.
sha265:...) instead of a tag (e.g.3.20.1). This ensures that an attacker cannot easily inject another image into the image registry which then gets used on service start up.
Pin Binaries in Images
Pinning software binaries you install is not that straight forward to do. There is a trade-off between how rigorous you pin binaries and how well your
Containerfilestays maintainable into the future with update etc. Different techniques exists for the different package manager:
Nix: If you build images directly with Nix or in a
Containerfilewithnixinstalled, pinning is never an issue since Nix solves this problem by design and most of the security considerations on this page do not apply.Debians
apt: Pinning is not that easy withapkbut the recommended way is this and this.Alpine Package Keeper
apk:The recommended way 75f523b3-5552-4aee-a842-a2c07b6dc4cd is the following. For example:
FROM alpine:3.18
RUN apk add \
    --no-cache curl=8.2.1-r2 \
    --repository=http://dl-cdn.alpinelinux.org/alpine/v3.18/main
Note: This will however make your
Containerfilenot buildable if the package is dropped fromalpine:3.18(there is not silver-bullet).Build from Source: This method is the best if you want to be more independent on the OS. Download the source and checksum check (
sha256sumorchksum) the source files and then build the software from source directly on that specific version.
Use an Image with a Minimal Number of Layers
Alpine Linux is a recommended choice, if it’s possible. Bitnami containers follow security’s best practices. Check if the application you need is already available!
Use Multi-Stage Build
Link: multi-stage build
Great way to eliminate unnecessary content in the final image, especially if you are using Go or other compiled language.
Verify the Signature of the Image
Enable Docker Content Trust
Docker Content Trust (DCT) provides the ability to use digital signatures for data sent to and received from remote Docker registries. These signatures allow client-side or runtime verification of the integrity and publisher of specific image tags.
If your goal is to push an image, you will need to generate a delegation key. Follow the steps here.
If your goal is to pull images, you can enable the docker trust variable like this:
export DOCKER_CONTENT_TRUST=1Then, a
docker pull someimage:latestwill only succeed ifsomeimage:latestis signed. However, an operation with an explicit content hash always succeeds as long as the digest exists. For instance:docker pull registry.example.com/user/image@sha256:d149ab53f8718e987c3a3024bb8aa0e2caadf6c0328f1d9d850b2a2a67f2819a
No Secrets in Image
Don’t include anything in any layer that you are not prepared to be seen by anyone who has access to the image.
Scanners
Scanners run on the image. They check if there are known vulnerabilities in the technologies used. Here, we present only static scanners. They only examine the code and don’t execute it. In this document, we will not cover dynamic scanners, as they often require non-free tools and a whole infrastructure to analyze the runtime.
Scan Image with a Security Scanner
Some scanners : trivy, docker scout
You can pick one of them or any others you know. It is not necessary to run multiple scanners, they will normally all give pretty much the same results.
If you have any critical/high/medium vulnerability and you work with sensitive data, you need to fix the issues or find another image.
docker scoutYou will need a docker account to use it
curl -sSfL https://raw.githubusercontent.com/docker/scout-cli/main/install.sh | sh -s --
or install manually here
To run a scan with all vulnerabilities and their summary, use:
docker scout cves python:3.4-alpine
If you just want a quick overview (no details):
docker scout quickview python:3.4-alpine
trivydocker pull aquasec/trivy:0.42.1 docker run aquasec/trivy:0.42.1 image python:3.4-alpine
If you want to also check for secrets or misconfiguration, use the command (obviously, it’s a bit slower):
docker run aquasec/trivy:0.42.1 image --scanners config,secret,vuln python:3.4-alpine
Run Docker Bench Security
Link: docker bench security
The Docker Bench for Security is a script that checks for dozens of common best-practices around deploying Docker containers in production. This will not scan your code to check common vulnerabilities (like
trivy> and >docker scout). But it can help you have a insight of your global configuration.It helps you automatically check most of the security best practices/requirements presented here. Be careful, some checks still need to be done manually.
Install
git clone https://github.com/docker/docker-bench-security.git cd docker-bench-security sudo sh docker-bench-security.sh
Flags
These recommendations apply if you have a control on the docker run command
Set File System and Volumes to Read-Only
Set the flag
--read-onlywhen running the containerThis requirement is strongly recommended when working with sensitive data.
Limit Hardware Resources
Avoid Denial of Services attacks by limiting resources. You can limit memory, CPU, maximum number of restarts (
--restart=on-failure:<number_of_restarts), maximum number of file descriptors (--ulimit nofile=<number>) and maximum number of processes (--ulimit nproc=<number>).
Set the Flag no-New-Privileges
Add the security flag
--security-opt=no-new-privilegesto prevent escalate privileges usingsetuidorsetgidbinaries.
Limit Capabilities
Docker, by default, runs with only a subset of capabilities. You can change it and drop some capabilities (flag
--cap-drop) to harden your docker containers, or add some capabilities (flag--cap-add) if needed.
- The most secure setup is to drop all capabilities
--cap-drop> all > and then add only required ones.- NEVER run containers with the
--privilegedflag (this will add ALL Linux kernel capabilities to the container)More on this subject : Secure Your Containers with this One Weird Trick
Set Flag --Icc=false or Disable docker0
By default inter-container communication (ICC) is enabled - it means that all containers can talk with each other, using
docker0bridged network.
docker0is a virtual bridge interface created by Docker. It randomly chooses an address and subnet from a private defined range. All the Docker containers are connected to this bridge and use the NAT rules created by docker to communicate with the outside world (source).
One solution is to disabled by running docker daemon with
--icc=falseflag. It is then required to tell which containers can communicate using--link=CONTAINER_NAME_or_ID:ALIASoption or by creating a dedicated network.Note that the icc parameter only apply to the default bridge.
Alternatively, you can disable this default connection (
docker0) of all the containers by specifying the option--bridge=noneand create a dedicated network for every connection with the command:docker network create <network_name>And then use it to access the host network interface
docker run --network=<network_name>This requirement is strongly recommended when working with sensitive data, you should use one of these two solutions.

Containers
These recommendations apply when you write a Dockerfile
Set a User Instead of root
```dockerfile
FROM <base image>
RUN addgroup -S appgroup && adduser -S appuser -G appgroup
USER appuser
...

<rest of Dockerfile> ...
sets the UID to be used inside the container. It is useful to limit the privileges of the specific program which run within the container itself.
What risks is mitigates: The primary benefit to these approaches is that they limit the capabilities of an attacker to gain root privileges within the container, which will help prevent their ability to break out of the container to the host.
When is it ok to run a container as root?
The container needs to modify the host system (i.e. the kernel).
The container needs to bind to privileged ports (1-1024).
- In practice, this can be avoided by using port mapping.
The container needs to install software at runtime.
- This is a really, really bad practice.
Short answer: it’s not.
Enable User Namepsaces
Link: user namespaces
You should enable user namespace support in Docker daemon to utilize container user to host user re-mapping. This recommendation is beneficial where the containers you are using do not have an explicit container user defined in the container image.
If the container images that you are using have a pre-defined non-root user, this recommendation may be skipped as this feature is still in its infancy, and might result in unpredictable issues or difficulty in configuration.
Prefer COPY Instead of ADD
COPYonly supports the basic copying of local files into the container, whileADDhas some features (like local-only tar extraction and remote URL support) that are not immediately obvious. UseADDonly if you completely trust the source.
Keep Your Secrets Safe
- Never include sensitive information in plaintext in a ENV file.
- Never put any hardcoded secret in the image.
In general, vulnerability scanners also check if secrets are stored in the wrong places.
If you need secrets at runtime, pass them trough a file or use a secret manager.
If you need secrets at build time (
docker build), pass them through the--secretmechanism.
Don't Allow Software Installation at Runtime
Install all the software you need during the build process and then remove the possibility to install any other tools (by changing the user, using a minimal image, …)
Installing software at runtime is not efficient, it means the new tool has not been scanned for security vulnerabilities and the container is not immutable.
Infrastructure
These recommendations apply if you have an access to the host and to the Docker deamon.
Enable SELinux or Seccomp or AppArmor
SELinux and AppArmor are access control systems. They grant or deny access to resources and control systems built into the Linux kernel. They are normally installed by default on most Linux distributions.
These systems improves server security by restricting and defining how a server processes requests and how users can interact.
If you are running Docker in rootless mode, you will not be able to run AppArmor.
You can choose one of these applications (depending on the platform or your use case, you may have only one option). You don’t need to install all of them at the same time.
Some tips on how to choose, depending on your use case:
- If you are running a CentOS container, use SELinux. It uses SELinux by default, it’s a built-in feature.
- SELinux, by default, separates containers from each other and also from the host filesystem.
- With AppArmor, it’s not possible to keep separation between containers. AppArmor separates containers from the host, but the default container policy is very loose and needs to be improved to prevent access to the entire host filesystem.
- AppArmor is more user-friendly.
- You can combine AppArmor and Seccomp.
This requirement is strongly recommended when working with sensitive data.
Run Docker in Rootless Mode
Link: rootless mode
Rootless mode allows running the Docker daemon and containers as a non-root user to mitigate potential vulnerabilities in the daemon and the container runtime. Rootless mode does not require root privileges even during the installation of the Docker daemon, as long as the prerequisites are met.
Although Docker, lets you run Docker commands as a regular (non-root) user, the Docker daemon that carries out those requests runs as root. As a result, regular users can make requests through their containers that can harm the system (privilege escalation).
What risks it mitigates :
If an attacker breaks out of the container, they will not have root privileges on the host, limiting the attack surface substantially. If your host is properly isolated on the network, or if it is in a lab environment and the host has no access to any sensitive data, you may not need to run in rootless mode.
This feature in not native by default. This means that running Docker in rootless mode may break some functionalities (see the > official page > for more information).
Set Logging Level to Min. INFO
Logs are important because they keep a trace of all the interactions related to Docker. Setting the logging level is the default step. If you are running a whole infrastructure, you may also consider how you will monitor these logs and how you will manage the backups.
Network
Don’t Enable TCP Docker Daemon Socket
If you are running docker daemon with
-H tcp://0.0.0.0:XXXor similar you are exposing unencrypted and unauthenticated direct access to the Docker daemon, if the host is internet connected this means the docker daemon on your computer can be used by anyone from the public internet.
Don’t Expose /var/run/docker.sock to Other Containers
For some use cases, you may want to run docker inside a docker container and may use the following command:
docker run -v /var/run/docker.sock:/var/run/docker.sock -ti docker
/var/run/docker.sockis the default Unix socket. Sockets are meant for communication between processes on the same host. Docker daemon by default listens to docker.sock. If you are on the same host where Docker daemon is running, you can use the/var/run/docker.sockto manage containers.The default permissions of the Docker daemon socket are usually
777, which means that any user on the system can access it.If the Docker daemon socket has wide-open permissions, anyone with access to the system can potentially access the Docker daemon and perform actions such as creating, executing, and deleting containers. This could potentially lead to the modification or destruction of important data or systems.
It is recommended to restrict the access (with
750for instance).
Example
This is an example of a Dockerfile/Containerfile following the security best
practices
(source):
# minimal base image
# specific tag
FROM python:3.10-slim AS base

# environment variables to prevent buffer issues and ensure predictable behavior (if applicable)
ENV PYTHONUNBUFFERED=1 \
    PYTHONDONTWRITEBYTECODE=1 \
    LANG=C.UTF-8 \
    LC_ALL=C.UTF-8

# non-root user for the app
RUN groupadd -r appgroup && useradd --no-log-init -r -g appgroup appuser

# working directory and ensure permissions are secure
WORKDIR /app
RUN chown appuser:appgroup /app

# install only necessary packages
# clean up dependencies
RUN apt-get update && apt-get install -y --no-install-recommends \
    build-essential \
    libssl-dev \
    && rm -rf /var/lib/apt/lists/*

# non-root user
USER appuser

# copy application code with proper permissions
COPY --chown=appuser:appgroup . /app

# python dependencies
# dedicated virtual environment to isolate dependencies
RUN python -m venv /app/venv \
    && . /app/venv/bin/activate \
    && pip install --no-cache-dir --upgrade pip setuptools wheel \
    && pip install --no-cache-dir -r requirements.txt

# expose application port
EXPOSE 8000

# health check to ensure container is operating correctly
HEALTHCHECK --interval=30s --timeout=10s --start-period=5s --retries=3 \
    CMD curl -f http://localhost:8000/health || exit 1

# specify the entry point
ENTRYPOINT ["/app/venv/bin/python"]
CMD ["app.py"]
And this is an example of a docker command:
docker run
--name myapp
--rm -it
-u 4000
--security-opt no-new-privileges
--cap-drop=ALL
--cap-add=NET_BIND_SERVICE
-p 8080:80
--cpus=0.5
--restart=on-failure:5
--ulimit nofile=5
--ulimit nproc=5
--memory 128m
--read-only
--tmpfs /tmp:rw,noexec,nosuid
-v /usr/local/myapp:/app/:ro
--bridge=none
--network=web
--log-driver=<logging driver>
myimage:latest
Documentation
- https://github.com/OWASP/Container-Security-Verification-Standard
- https://github.com/krol3/container-security-checklist
- https://cheatsheetseries.owasp.org/cheatsheets/Docker_Security_Cheat_Sheet.html
- Docker-Security-Cheatsheet (GitGuardian)
To Infinity and Beyond
Podman
Podman, just like Docker, is a tool for managing containers.
Unlike Docker, it has some built-in security mechanisms. The biggest difference is that Podman is deamonless by design.
Docker versus Podman Architecture (source):
In Docker, starting a container means sending a request to the Docker daemon via the Docker client. This means that the container processes are children of the Docker daemon, not the user session.
With Podman, the container is instantiated directly through a user login session.
Podman understands Docker commands. It is possible to install podman and create an alias
alias docker=podman
Some considerations about the two technologies (source):
| Podman | Docker | |
|---|---|---|
| Daemonless Architecture | ✔️ | ❌ |
Integration with systemd | ✔️ | ❌ |
| Group containers in pods | ✔️ | ❌ |
| Supports Docker Swarm | ❌ | ✔️ |
| Supports Kubernetes YAML | ✔️ | ❌ |
Singularity
The principle of Singularity seems close to Podman (secure by design) but the documentation is hard to find (so to be continued)
Supported by: